
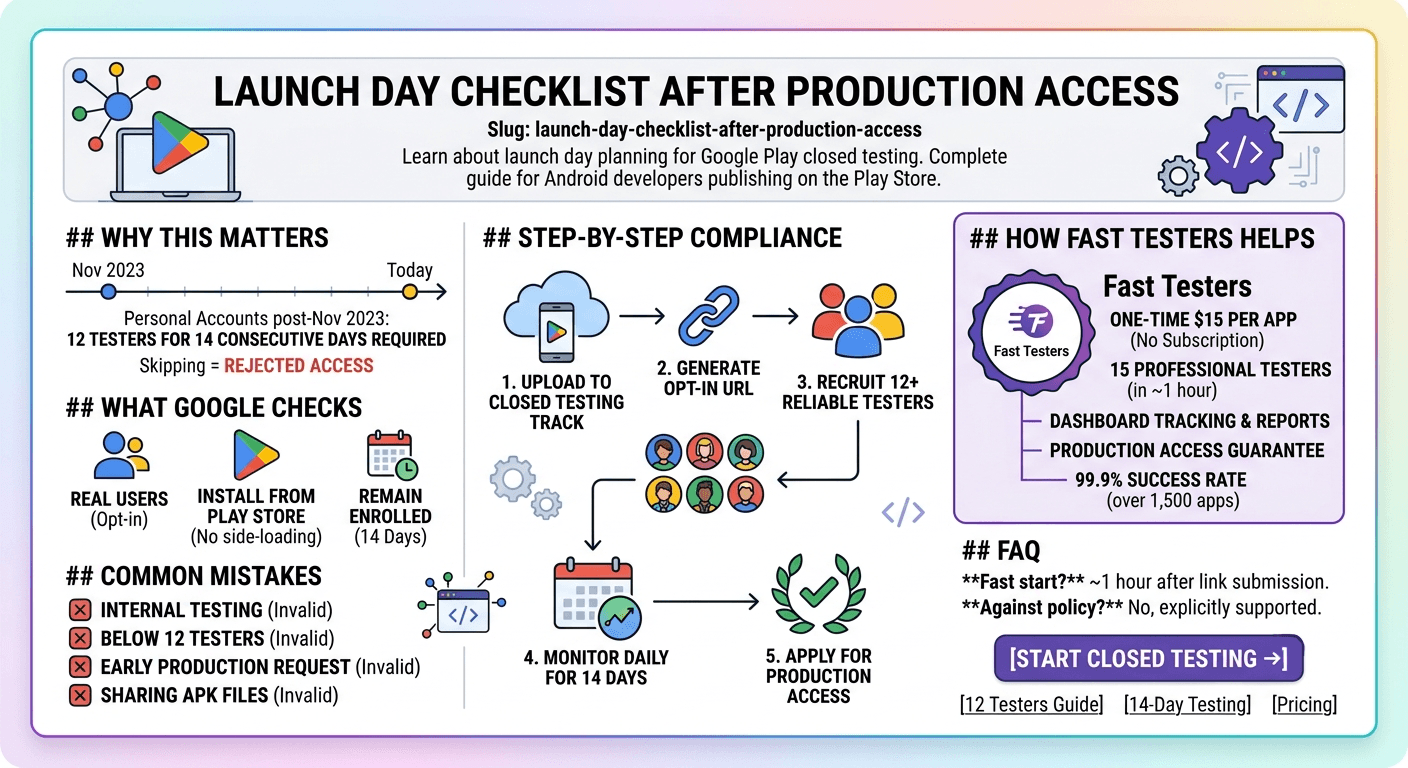
Securing production access on the Google Play Console is an incredible milestone, but it is not the final step. For newer personal developer accounts, navigating the strict requirements of Google Play closed testing is a high-stakes gatekeeper. Transitioning successfully from track setup to your formal public release requires precise launch day planning to ensure your compliance holds up under automated review.
Important Policy Notice: Personal developer accounts created after November 2023 cannot skip straight to open production. Google relies on a rigorous automated audit of opt-ins and app engagement data before granting release access.
Why Google Play Closed Testing Metrics Matter
Google implements this evaluation phase to preserve ecosystem quality. Specifically, you must run a closed testing track with at least 12 testers who remain actively enrolled for 14 consecutive days. If your testing group drops below 12 active users at any moment during those two weeks, the automated 14-day counter resets entirely.
Google tracks app usage telemetry via the Play Services framework. This means that fake interactions, device emulation farms, or sideloaded APK installations will not satisfy the algorithm. Real users must access your testing build naturally from their unique Play Store accounts.
Step-by-Step Launch Day Checklist
To keep your release completely on track without encountering compliance blocks, execute this step-by-step framework directly inside your Play Console account:
1. Finalize the Closed Testing Track Release
Upload your signed App Bundle (.aab) explicitly to the Closed Testing channel. Avoid deploying it as an Internal Test, as internal tracks do not contribute toward production access milestones.
2. Retrieve the Store Opt-In Link
Navigate directly to the Testers tab inside your track configuration. Copy the web or Android opt-in URL. This link is the exclusive gateway your testers must use to officially download your build.
3. Onboard 12+ Active Testers
Gather your testing cohort. Because regular churn happens, aiming for 15 reliable devices gives you a safe buffer. Alternatively, platforms like Fast Testers can instantly provision 15 verified human testers within an hour.
4. Monitor Active Installations Daily
Keep a close eye on your tracking dashboard. Ensure your cohort leaves the application installed on their primary devices for the full 14-day duration without uninstalling.
Pitfalls to Avoid During Launch Planning
Even seasoned engineering teams can make simple mistakes that reset their release timelines. Keep your deployment secure by avoiding these structural mistakes:
What Disturbs Your App Approval
- Distributing raw APK files directly to testers instead of sending the formal Play Store join link.
- Letting the total number of enrolled testers drop under 12 mid-way through the track period.
- Prematurely applying for full production access on Day 13 or earlier.
- Relying exclusively on virtual devices or automated device farms.
What Secures App Approval
- Verifying that every tester formally uses the web-based opt-in flow first.
- Maintaining a structural buffer of 15+ devices to offset accidental uninstalls.
- Logging continuous, organic interaction data over 14 uninterrupted days.
- Reviewing localized crash data regularly via your console logs.
How Fast Testers Optimizes Your Release
Self-recruiting 12 to 15 responsive individuals who will keep an app installed for two straight weeks is often a painful logistical bottleneck. Fast Testers eliminates this friction via a secure, fully compliant testing environment built for developers.
For a straightforward, one-time flat fee of $15 per app (no recurring subscriptions), your release is paired with 15 professional Android testers. The service gives you dashboard validation, reliable analytical reports, and a concrete production access guarantee. To date, over 1,500 apps have successfully made the leap to public distribution using this exact framework, maintaining a 99.9% approval success rate.
Frequently Asked Questions
How fast do my assigned testers begin?
Onboarding begins almost immediately. Testers typically start downloading and engaging with your application within one hour of submitting your functional closed testing track link.
Does using testing networks violate Google Play policy?
Not at all. Recruiting real, external web-invited users to join a dedicated testing track is fully supported and recommended by Google's developer terms.
What happens if my application is initially rejected for core policy issues?
Don't worry. If Google flags design or data policy errors, you can fix those adjustments and update the build. Your completed 14-day tester tracking baseline remains valid and counts toward your release goals.
Ready to Clear Your Production Hurdle?
Skip the stress of finding individual devices. Secure your 15 professional Android testers today and protect your launch timeline.
Start Closed Testing →You cleared the window — now what
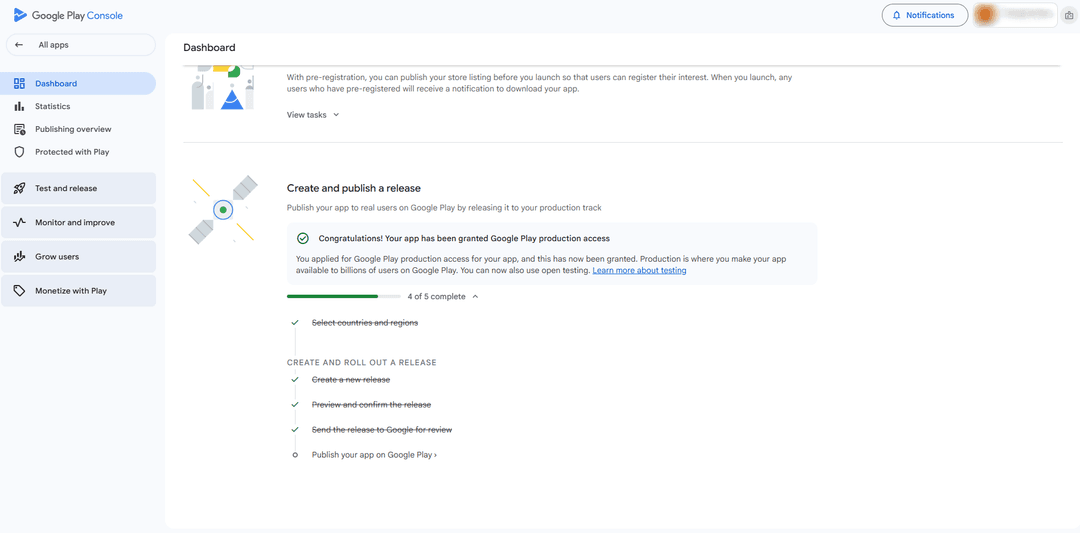
Reaching production access means you have completed the mandatory closed test — 12 testers opted in for 14 continuous days — and Google has approved your request. Launch day is where all that preparation pays off, but it is also where last-minute mistakes can undo it. This checklist assumes the hard part (the window) is done and focuses on releasing cleanly and safely. The single most important principle: do not release to everyone at once. Use a staged rollout so any surprise reaches only a fraction of users. See our closed testing guide and staged rollouts.
Keep your testers engaged even now, because a reliable pool lets you validate any hotfix before it ships to your growing user base. To keep dependable testers on call, you can submit your app. See keeping testers engaged.
Final pre-release checks
Before you click publish, confirm the essentials one last time: the correct signed build is selected, the version code is higher than any prior, your store listing and assets are final and accurate, all required declarations (content rating, Data safety, privacy policy) are complete and consistent, pricing and country availability are set, and your support contact works. A five-minute verification of these prevents the embarrassing launch-day errors — a wrong build, a broken link, a missing declaration — that are entirely avoidable. See the first-app checklist and privacy policy requirements.
Double-check that your listing tells a coherent story and that your screenshots and description match the shipping build, since a mismatch here reads as sloppy to new users. This is your first impression at scale, so make it clean. See store listing optimization.
Executing the staged rollout
Start your production release at a small percentage — many developers begin around 5–20% — and watch your Android vitals and reviews closely before expanding. If crash-free and ANR rates hold and no serious complaints appear, increase the percentage in steps over hours or days until you reach 100%. If a problem surfaces, halt the rollout, fix it, and resume with a corrected build. This measured approach means a launch-day bug is a contained incident, not a public disaster that tanks your rating. See post-launch monitoring and Google's staged rollout documentation.
Have your monitoring open during the rollout so you see issues in near-real time. The first hours are when new-user traffic and diverse real-world conditions expose anything your window missed, so active attention pays off. See Android vitals.
The first days after launch
Launch is a beginning, not a finish. In the first days, respond to early reviews, watch for recurring bug reports, and be ready to ship a hotfix through your tracks if needed. Announce your launch through whatever channels you have, and make sure support is staffed for the initial questions. Feed everything you learn — confusion points, requested features, device-specific issues — into your roadmap. An attentive first week builds the ratings and word of mouth that drive early growth. See handling user reviews and support setup.
Then settle into a healthy update cadence, using staged rollouts for every release. The discipline that got you to launch day is exactly what sustains the app afterward. See updating after release.
Related guides and resources
- Staged rollouts after production access
- Post-launch monitoring
- First app complete checklist
- Staged rollouts (Google)
Launch day FAQ
Should I release to everyone at once?
No. Start with a small staged-rollout percentage and expand as vitals and reviews stay healthy, so any surprise reaches only a fraction of users.
What should I verify before publishing?
The correct signed build and version code, final listing and assets, complete consistent declarations, pricing and availability, and a working support contact.
What if a bug appears during rollout?
Halt the rollout, fix the issue, and resume with a corrected build. A staged rollout keeps the impact contained while you respond.
What percentage should I start a rollout at?
Many developers begin around 5–20%, watch vitals and reviews, and expand in steps to 100% only as the data stays healthy.
Bottom line
Launch day rewards preparation: verify your build, assets, and declarations one last time, then release via a staged rollout while watching vitals and reviews, expanding only as the data stays healthy. Stay attentive through the first days, respond to users, and ship hotfixes through your tracks if needed. Keeping reliable testers on call to validate those hotfixes makes launch week far less stressful — you can submit your app. See staged rollouts for the rollout details.
Expanded for topical authority — additional practical sections below. Original guide content above is unchanged.
Quick answer
Launch Day Checklist After Production Access matters because Google Play production access for many new personal developer accounts depends on a successful closed test: at least 12 real testers opted in for 14 continuous days, plus a policy-compliant, stable app. Use this guide to execute the steps correctly, avoid streak-breaking mistakes, and decide whether DIY recruitment or a managed closed testing service is the better path for your deadline.
Key takeaways
- Launch Day Checklist After Production Access should be treated as a practical Play Console workflow, not just theory.
- For many new personal accounts, 12 opted-in testers × 14 continuous days on closed testing gates production access.
- Opt-in + install from Play beats “emails invited” every time — verify counts in Console.
- Use the window for QA, listing, and compliance work so review is the only remaining gate.
- Prefer real testers and a buffer above 12; avoid anything that looks like fake engagement.
Real-world scenarios: who this matters for
The guidance in this article on Launch Day Checklist After Production Access applies across many Android product types. Use these scenarios to map the advice to your situation.
| Developer type | Typical challenge | Practical focus |
|---|---|---|
| Indie / solo | Limited tester network and time | Start closed testing early; keep a buffer above 12 opted-in testers; parallelize listing + Data safety work |
| Startup | Launch deadline vs 14-day rule | Treat the window as fixed; recruit in parallel with QA; avoid last-minute track setup |
| Agency / white-label | Multiple client apps, each needing its own test | One closed test per app; standardize opt-in onboarding; track eligibility dates per client |
| Flutter / React Native | Cross-platform build + Play Console quirks | Ship a signed AAB to closed testing; verify installs from Play, not sideload; watch vitals on mid-range devices |
| Native Kotlin | Device/API fragmentation | Cover API levels and OEMs in your tester mix; fix crashes before requesting production |
| Game / Unity | Performance + retention during 14 days | Keep testers engaged so count never dips below 12; monitor ANRs and battery |
| E-commerce / fintech | Policy + payment flows | Test checkout, permissions, and declarations carefully before production access |
| Healthcare / kids / education | Sensitive policies (Families, data) | Align listing, privacy, and content rating with real app behavior during the test window |
Visual placeholder: Scenario matrix infographic — Indie / Startup / Agency / Cross-platform paths for Launch Day Checklist After Production Access.
Closed testing vs other Play tracks (quick reference)
Context for Launch Day Checklist After Production Access: choose the right track so you do not waste the 14-day window on the wrong workflow.
| Track | Purpose | Counts toward 12×14? | Typical use |
|---|---|---|---|
| Internal testing | Fast private builds | No | Shake out bugs before the counted window |
| Closed testing | Private / invite testers | Yes (for new personal accounts) | Meet production-access requirement + QA |
| Open testing | Public beta | Not a substitute for the closed requirement | Broader feedback after closed eligibility |
| Production | Public release | N/A | After access approved + review |
Visual placeholder: Timeline — Internal → Closed (14 days) → Production request → Staged rollout.
Common mistakes (and how to avoid them)
These mistakes repeatedly show up when developers work through Launch Day Checklist After Production Access:
- Confusing invited vs opted-in testers — Only testers who open the opt-in link and install from Play count toward 12. Check the opted-in number in Play Console, not your email list.
- Recruiting exactly 12 with no buffer — One uninstall can break continuity. Aim for ~15 active opted-in testers.
- Starting the counted clock late — Listing assets, Data safety, and privacy work should run during the 14 days, not after.
- Using sideloaded APKs or fake installs — They do not satisfy Play’s closed testing expectations and can create account risk.
- Ignoring tester feedback until day 14 — Crashes that drive uninstalls threaten your streak and your review outcome.
- Requesting production access before the continuous streak completes — Eligibility checks fail even if calendar time has passed.
Troubleshooting checklist
If something feels “stuck” while applying Launch Day Checklist After Production Access, walk this list before changing strategy:
| Symptom | Likely cause | Fix |
|---|---|---|
| Console shows < 12 testers | Invites sent but not opted in | Resend opt-in link; confirm install from Play |
| “Not eligible” after 14 calendar days | Count dipped below 12 mid-window | Restore 12+ and complete a full continuous streak |
| Tester cannot join | Wrong account, Group lag, or track not published | Verify Google account, Group membership, track release |
| App fails to install | Device/API mismatch or signing issue | Check AAB, minSDK, Play App Signing |
| Production still rejected after testing | Policy, declarations, or stability — not the clock | Read the exact reason; fix that category completely |
Visual placeholder: Troubleshooting flowchart for Launch Day Checklist After Production Access.
Action checklist
Use this checklist alongside the rest of this guide on Launch Day Checklist After Production Access:
- ☐ Closed testing track created with a signed release (AAB)
- ☐ Opt-in link tested on a fresh Google account
- ☐ At least 12 testers opted in (prefer ~15)
- ☐ Daily check that opted-in count stays ≥ 12 for 14 continuous days
- ☐ Core flows exercised (login, main feature, permissions, offline/online)
- ☐ Crashes / ANRs triaged from tester reports and vitals
- ☐ Store listing, screenshots, and feature graphic drafted
- ☐ Privacy policy + Data safety + content rating aligned with real behavior
- ☐ Production access requested only after eligibility is green
- ☐ Staged rollout plan ready for first public release
Additional FAQs developers ask about Launch Day Checklist After Production Access
Quick answer: what should I do first?
Confirm you are on a closed testing track with real opted-in installs, keep 12+ testers for 14 continuous days, and fix policy/stability issues in parallel. Then use the detailed sections above for Launch Day Checklist After Production Access.
Does this apply to organization (company) accounts?
The classic 12×14 closed testing gate is primarily associated with new personal developer accounts. Always verify your account type and current Play Console eligibility messaging for your app.
Do friends and family count as testers?
Yes — if they opt in via your closed testing link and install from Google Play. They only help if they stay opted in for the continuous period.
Can I update the app during the 14 days?
You can usually push updates on the closed track, but unstable releases that cause uninstalls can threaten your tester count. Prefer polishing via internal testing first when possible.
What if production access is still rejected?
Read the exact reason. Incomplete testing is only one category — policy, Data safety mismatches, and crashes are common. Fix the cited issue fully before reapplying.
Is paying for testers allowed?
Using real people who install from Play is what matters. Avoid fake install farms. A one-time managed service that supplies real closed testers is a practical option when DIY recruitment is too slow.
How is Fast Testers different from free communities?
Free communities trade time and mutual availability. Fast Testers assigns about 15 real testers after you submit a valid closed testing link (one-time $15 per app) and includes a production access guarantee under its refund terms.
Where should I go next?
Review the related guides below, then either finish DIY recruitment or start closed testing if you need speed and continuity.
Sources, updates, and how to use this guide
This article on Launch Day Checklist After Production Access is maintained for Android developers preparing Google Play closed testing and production access. Always cross-check eligibility text inside your own Play Console, because Google’s UI labels and account rules can vary by account type and date.
- Primary official references: Google Play closed testing help, Developer Program Policies, and Play Console eligibility messaging for your app.
- Practical experience lens: guidance here reflects common failure modes indie developers and agencies hit when recruiting testers, maintaining the 14-day streak, and recovering from production-access rejections.
- Last reviewed focus: 12×14 closed testing continuity, real vs fake testers, and parallel listing/compliance work during the window.
Related guides and next steps
Continue building topical depth around Launch Day Checklist After Production Access with these Fast Testers resources:
- Staged Rollouts After Production Access Approval
- App Not Eligible For Production Access
- Fastest Way To Get Google Play Production Access
- Google Play Production Access Rejection Reasons
- Handling User Reviews After Play Store Launch
- Updating Your App After Production Release
- When Can You Request Google Play Production Access
- Why Google Rejected My Production Access Request
- Pricing — $15 closed testing
- How Fast Testers works
- FAQ
- Developer reviews
- Case studies
- Submit your app / start closed testing
Need reliable testers so your 14-day streak does not stall? Educate first with the guides above, then start when you are ready — one-time pricing, real Play installs, dashboard tracking.
Further expansion — case study, decisions, and expert recommendations. Prior sections remain unchanged.
Case study: first Play launch planned around the closed testing window
Problem: A small SaaS team treated Google Play publishing like iOS TestFlight — they expected to upload and go public the same week. They discovered the personal-account closed testing gate mid-sprint.
Solution: They reframed the sprint around Launch Day Checklist After Production Access: internal testing for crash triage first, then closed testing with a buffer of testers, while design finished screenshots and legal finished privacy/Data safety in parallel.
Result: The 14-day requirement stopped feeling like “dead time.” When eligibility flipped green, listing and declarations were already ready, so production review was the only remaining gate.
Lessons learned:
- Start the closed track as soon as the build is stable enough to keep installed.
- Parallelize compliance work inside the window.
- Protect the streak like a production SLA.
Decision guide: what should you do next?
Use this decision path when applying Launch Day Checklist After Production Access:
- Is your account a new personal developer account that still needs production access?
If yes, plan for closed testing with 12+ opted-in testers for 14 continuous days. If no, still test — but confirm the exact eligibility text in Play Console. - Do you already have 12+ reliable people who will install from Play and stay for two weeks?
If yes, DIY can work — add a buffer and monitor daily. If no, use community exchange or a managed closed testing service. - Is your build stable enough that testers will not churn?
If no, run internal testing first. Entering the counted window with crash loops is how streaks die. - Are Data safety, privacy policy, permissions, and listing aligned with real behavior?
If no, fix during the window so production review does not bounce you after the clock. - Has production access been rejected?
Classify: eligibility vs policy vs declarations vs stability. Fix that category completely, then re-test / re-request.
Visual placeholder: Decision tree diagram for Launch Day Checklist After Production Access (DIY vs managed vs fix-and-retry).
Expert recommendations
- Instrument the streak: Check opted-in count daily for the first week; replace dropouts same day.
- Brief testers once: Send a short checklist (install from Play, open app daily, try core flow, report crashes). Silent testers still count if opted in — engaged testers protect quality.
- Never “solve” recruitment with fake installs: It fails the intent of closed testing and can create account risk.
- Ship a boring-stable build to closed testing: Save experimental features for internal tracks.
- Educate first, then accelerate: If your blocker is simply finding real testers fast, a one-time managed option (Fast Testers: 15 testers, $15/app) is often cheaper than slipping a launch.
For hands-on setup after reading about Launch Day Checklist After Production Access, see how it works and pricing, or submit your closed testing link when you are ready.
Internal navigation hub — added to strengthen topical connections. Original article content above is unchanged.
Topic cluster: Publishing on Google Play
Pillar guide: Start with How to Publish an App on Google Play Store for the full overview, then use the supporting guides below.
- How to Publish an App on Google Play Store (pillar)
- First App on Google Play: Complete Checklist
- Android App Release Checklist (2026)
- Preparing Your App Before Publishing on Google Play
- Google Play Store Submission Guide
- Google Play Console Beginner Guide
- Google Play Review Process Explained
- Google Play Approval Time: How Long Does It Take?
- Staged Rollouts After Production Access Approval
Continue learning
- Updating Your App After Production Release — Learn about post-launch updates for Google Play closed testing. Complete guide for Android developers publishi.
- Android App Release Checklist (2026) — A complete Android app release checklist for 2026 — from build signing and store listing to closed testing and.
- Bootstrapped Developer Play Store Launch on $15 — Learn about budget-friendly testing for Google Play closed testing. Complete guide for Android developers publ.
- Customer Support Setup Before Play Store Launch — Learn about support preparation for Google Play closed testing. Complete guide for Android developers publishi.
- First App on Google Play: Complete Checklist — Learn about first-time publishing for Google Play closed testing. Complete guide for Android developers publis.
- What Happens After 14 Days of Closed Testing? — Learn about post-testing production access for Google Play closed testing. Complete guide for Android develope.
Next steps
- Ready to run closed testing with real Android testers? Submit your app or see pricing ($15 one-time).
- Compare options on our testing service comparison page, or read developer reviews and case studies.
- Still deciding? Review how Fast Testers works and the FAQ.