
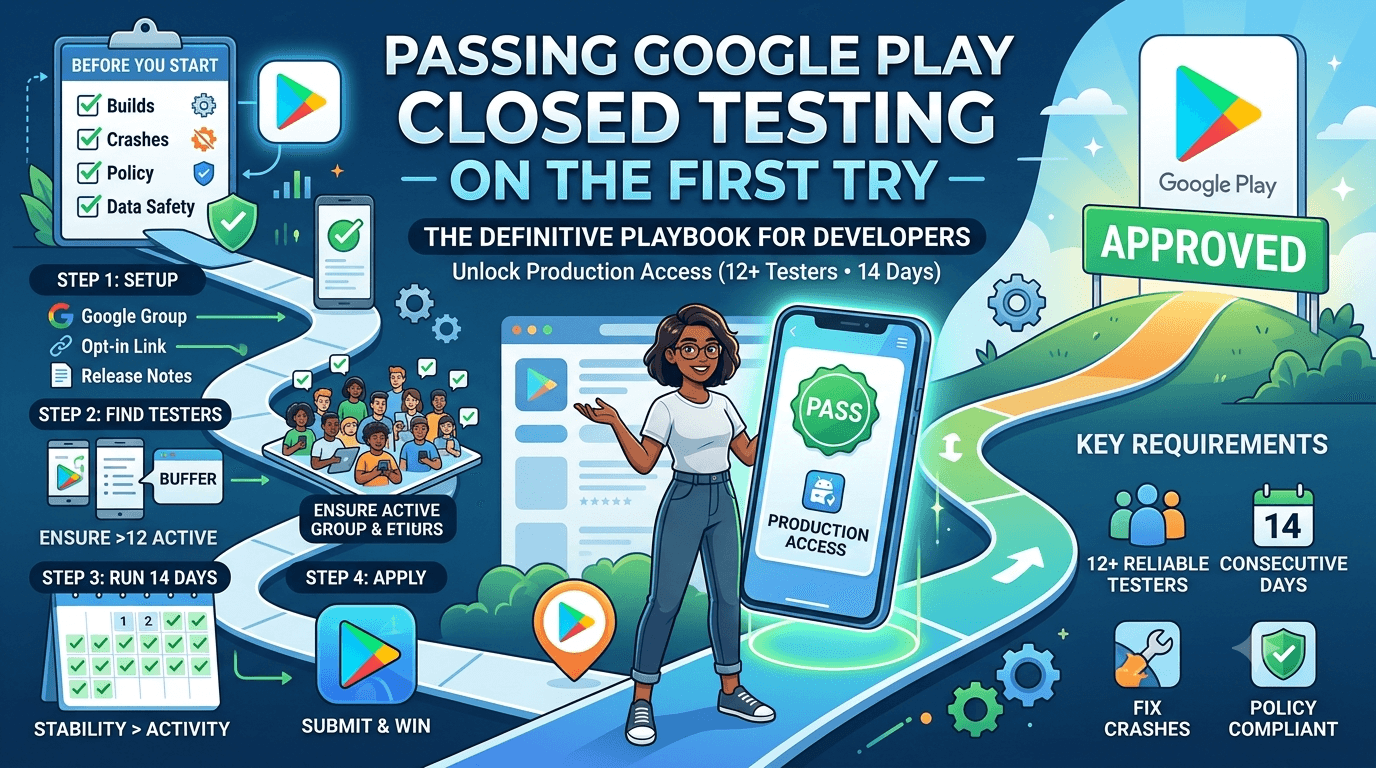
Passing Google Play Closed Testing on the first try is entirely achievable when you treat it as a process rather than a hurdle. Most developers who fail do so for avoidable reasons: the wrong track, too few testers, dropouts, or applying too early. This playbook walks you through every step so you complete the 12-tester, 14-day requirement cleanly and unlock production access without a second attempt.
The playbook
The 60-second answer
Featured answer: To pass Google Play closed testing on the first try, use the closed track (not internal), enroll 15+ real testers so you never drop below 12, keep them active for a full 14 consecutive days, fix crashes and policy issues before applying, and submit a clean production request with an accurate Data safety form.
Before you start: pre-flight checklist
- App builds and installs on a range of real devices.
- No hard crashes on launch or core flows — see crash reports during closed testing.
- Store listing, screenshots, and description are ready.
- Data safety form is accurate: data safety form guide.
- Privacy policy is live: privacy policy requirements.
- App meets the current target API level.
Tip: Fix quality and policy issues before the 14 days begin. Testing time is fixed; you do not want to discover a blocker on day 13.
Step 1 — Set up the closed testing track
In Play Console, open Testing → Closed testing, create a track, and upload your signed app bundle (AAB). Write release notes that tell testers what to try. For a full walkthrough with screenshots, see how to create a closed testing track.
Create your tester list — a Google Group is the most reliable option — and generate the opt-in link. Details: opt-in link setup.
Warning: Do not use the internal testing track for this requirement. Only the closed track counts toward the 12-tester, 14-day rule. See internal vs closed testing.
Step 2 — Line up 12+ reliable testers
This is where most first attempts fail. You need testers who will join and stay for the full 14 days. Your options:
| Method | Speed | Reliability |
|---|---|---|
| Friends & family | Slow | Low (dropouts) |
| Reddit / forum swaps | Slow | Medium |
| Telegram / Facebook groups | Medium | Low (churn, fakes) |
| Professional testing service | Fast (~1 hour) | High (buffer + accountability) |
Whatever you choose, enroll at least 15 testers to protect the 12 minimum. Compare recruiting approaches in best way to find Android beta testers.
Want first-try certainty? FastTesters assigns 12+ real, worldwide Android testers within about an hour, keeps a buffer against dropouts, and provides feedback reports. See pricing and how it works.
Step 3 — Run 14 clean days
- Confirm all testers have opted in and installed from Play on day one.
- Monitor the console daily; keep active testers at 12+.
- Encourage real usage — an app that testers actually open produces a stronger signal.
- If you must push an update mid-test, do it carefully: updating your app mid closed testing.
- Do not remove testers or switch tracks during the window.
Step 4 — Apply for production the right way
- Wait until the full 14 consecutive days have elapsed.
- Double-check your listing, Data safety, and content compliance.
- Submit the production request with a clear summary of what testers validated.
- Keep testers enrolled until access is granted.
What to expect next: what happens after 14 days. If anything goes wrong, our rejection reasons guide helps you diagnose it.
Pitfalls that cause a fail
- Dropping below 12 active testers mid-period.
- Using internal testing instead of closed testing.
- Sideloading APKs instead of installing from Play.
- Fake or emulator installs — detected and discarded.
- Applying before day 14 or with an inaccurate Data safety form.
Why most first attempts fail
Before optimizing for success, it helps to understand the failure patterns you are trying to avoid, because nearly every failed first attempt traces back to a short list of causes. The most common is a tester shortfall: the developer never truly reaches 12 opted-in testers, or reaches it briefly and then slips below as people drop out. The second is a track mistake — using internal testing instead of closed testing, which does not count toward the requirement. The third is impatience, applying for production before the full 14 consecutive days have elapsed. The fourth is a quality or policy blocker discovered too late to fix within the window.
What these failures share is that they are all preventable with preparation. None of them are about bad luck or Google being arbitrary; they are about logistics and sequencing. If you design your process to eliminate these four failure modes, first-try success becomes the default rather than the exception.
A week-by-week plan for a clean pass
Turning the checklist into a schedule makes it far easier to execute. Here is a simple plan that spreads the work sensibly across the two-week window and the days around it.
- Before day 1: Finish your build, fix known crashes, complete the data safety form and privacy policy, and confirm your target API level. Set up the closed track and opt-in link. Line up 15+ testers so you can start at full strength.
- Days 1–2: Confirm every tester has opted in and installed from Play. Verify your count is comfortably above 12. Watch for any early crashes testers hit immediately.
- Days 3–10: Let the test run. Monitor your console daily, keep the count above 12, and triage any feedback. Fix serious bugs carefully if needed.
- Days 11–13: Finalize your store listing and double-check compliance so nothing blocks your application. Keep testers engaged.
- Day 14+: Apply for production with a clear summary, and keep testers enrolled until access is granted.
Following a plan like this removes the two biggest risks — a slow start and a late-discovered blocker — by front-loading preparation and back-loading the application.
Why stability beats activity
A common misconception is that you need testers hammering the app constantly, pushing frequent updates to show activity. In reality, a stable, unchanging build usually produces a cleaner result than a busy, ever-changing one. Every mid-test update carries the risk of introducing a new crash, and a build that keeps changing is harder for testers to engage with consistently. The stronger signal comes from a solid app that testers can actually use without frustration over the full window.
This is why freezing features before your test begins is such good practice. Decide the app is done, stabilize it, and let the 14 days validate that finished build. If you must ship an update mid-test — for a genuine bug fix — do it deliberately and test the new build yourself first, following the guidance in updating your app mid closed testing.
Working in parallel to save time
The 14-day window is not dead time — it is your opportunity to complete everything else your launch needs. While your testers keep and use the app, finalize your marketing assets, write your production release notes, verify your identity if you have not already, and prepare any support channels. By the time day 14 arrives, you should be able to apply for production immediately and, once approved, launch without a scramble. Developers who treat the two weeks as a parallel work sprint rather than a waiting period consistently launch faster and more smoothly.
Frequently asked questions
Can I really pass on the first try?
Yes. First-try success comes down to using the right track, keeping 12+ real testers for the full 14 days, and fixing policy/quality issues before applying.
How many testers give me a safety margin?
Enroll 15+ so a couple of dropouts never push you below 12.
Does the app need frequent updates during testing?
No. Stability matters more than activity. Update only to fix real issues, and do it carefully.
How long is the whole process?
The testing itself is 14 fixed days plus a short review after you apply. Recruiting time is the main variable — a service removes it. See how long closed testing takes.
What if I fail anyway?
Identify the exact cause, fix it, and reapply. Testing that was valid still counts.
Tools and dashboards for monitoring your test
Passing on the first try is much easier when you can actually see what is happening during your 14 days, so it pays to know where to look. Inside Play Console, the closed testing track shows you how many testers have opted in and installed, which is your primary compliance metric — you are watching to ensure this stays comfortably above 12. The Android vitals section surfaces crashes and ANRs your testers encounter, giving you an early warning of stability problems while there is still time to fix them. The pre-launch report, generated when you upload a build, runs automated checks on real devices and flags issues before your human testers even begin.
Checking these daily takes only a few minutes but transforms your test from a black box into a controlled process. If your opt-in count is drifting toward 12, you know to add testers immediately. If vitals show a crash cluster, you can investigate before it undermines your signal. Developers who monitor actively rarely get blindsided; those who upload and ignore the console until day 14 are the ones who discover problems too late to fix.
Handling edge cases: paid apps and logins
Certain app configurations add wrinkles to closed testing that are worth planning for. If your app is behind a login or account wall, your testers — and later Google's reviewers — need a way in. Provide clear test credentials or a straightforward sign-up path, because an app that cannot be accessed cannot be properly tested or reviewed. If your app is paid or relies on in-app purchases, ensure your testing setup lets testers reach the functionality without real charges, using license testing where appropriate, so the core experience can actually be validated.
These edge cases are not obstacles so much as details to handle deliberately. The failure mode is discovering on day one that your testers are stuck at a login screen or a paywall, wasting days of your fixed window. Address access up front: decide exactly how a fresh tester gets into the meaningful parts of your app, document it in your release notes, and confirm it works before the window begins.
What a good release note looks like
Release notes are easy to neglect, but for testers they are the difference between aimless poking and focused testing. A good release note tells testers what the app does, what you want them to try, and how to access anything gated. Instead of a terse "bug fixes," write something like: "This is a task-management app. Please create an account, add a few tasks, mark some complete, and try the calendar view. Test login is available on request." Concrete guidance produces concrete feedback, and testers who understand what to do are more likely to actually engage — which strengthens exactly the signal Google is measuring. Treat your release notes as a mini briefing for your testers, and both your feedback quality and your engagement will improve.
Key takeaways
- Use the closed track. Internal testing does not count toward the requirement.
- Start at full strength. Enroll 15+ real testers so you never dip below 12.
- Stability beats activity. Freeze features and let a solid build run the full 14 days.
- Monitor daily. Watch opt-in counts, vitals, and the pre-launch report to catch issues early.
- Work in parallel. Finish listing, compliance, and assets during the window so you apply immediately on day 14.
Conclusion
Passing Google Play closed testing on the first try is a matter of preparation and reliable testers. Set up the closed track correctly, enroll a buffer of real testers, run a clean 14 days, and apply with a compliant listing. Remove the recruiting bottleneck and the rest is procedure. Ready to start with real testers? Submit your app and begin your 14-day clock today.
Expanded for topical authority — additional practical sections below. Original guide content above is unchanged.
Quick answer
How to Pass Google Play Closed Testing on the First Try matters because Google Play production access for many new personal developer accounts depends on a successful closed test: at least 12 real testers opted in for 14 continuous days, plus a policy-compliant, stable app. Use this guide to execute the steps correctly, avoid streak-breaking mistakes, and decide whether DIY recruitment or a managed closed testing service is the better path for your deadline.
Real-world scenarios: who this matters for
The guidance in this article on How to Pass Google Play Closed Testing on the First Try applies across many Android product types. Use these scenarios to map the advice to your situation.
| Developer type | Typical challenge | Practical focus |
|---|---|---|
| Indie / solo | Limited tester network and time | Start closed testing early; keep a buffer above 12 opted-in testers; parallelize listing + Data safety work |
| Startup | Launch deadline vs 14-day rule | Treat the window as fixed; recruit in parallel with QA; avoid last-minute track setup |
| Agency / white-label | Multiple client apps, each needing its own test | One closed test per app; standardize opt-in onboarding; track eligibility dates per client |
| Flutter / React Native | Cross-platform build + Play Console quirks | Ship a signed AAB to closed testing; verify installs from Play, not sideload; watch vitals on mid-range devices |
| Native Kotlin | Device/API fragmentation | Cover API levels and OEMs in your tester mix; fix crashes before requesting production |
| Game / Unity | Performance + retention during 14 days | Keep testers engaged so count never dips below 12; monitor ANRs and battery |
| E-commerce / fintech | Policy + payment flows | Test checkout, permissions, and declarations carefully before production access |
| Healthcare / kids / education | Sensitive policies (Families, data) | Align listing, privacy, and content rating with real app behavior during the test window |
Visual placeholder: Scenario matrix infographic — Indie / Startup / Agency / Cross-platform paths for How to Pass Google Play Closed Testing on the First Try.
Comparison: DIY recruitment vs managed closed testing
When your goal is Google Play production access, the path you choose for testers affects time, risk, and feedback quality. Use this comparison while deciding how to apply How to Pass Google Play Closed Testing on the First Try.
| Approach | Time to 12 opted-in | Cost | Dropout risk | Feedback quality | Best when |
|---|---|---|---|---|---|
| Friends & family | Days–weeks | $0 | High | Mixed | Tiny MVP, flexible timeline |
| Reddit / Discord / Telegram | Unpredictable | $0–low | High | Variable | You can manage onboarding daily |
| Peer community exchange | Variable | $0 | Medium | Developer-biased | You can test others’ apps in return |
| Managed closed testing (e.g. Fast Testers) | ~1 hour after valid link | $15 one-time / app | Low (buffer of 15) | Real Play installs | You need speed + continuity for 14 days |
Decision tip: If a broken streak would delay revenue or a client deadline, prioritize reliability over $0 recruitment. DIY is fine when you already have engaged testers and can monitor Play Console daily.
Visual placeholder: Comparison diagram — DIY vs community vs managed testing for How to Pass Google Play Closed Testing on the First Try.
Common mistakes (and how to avoid them)
These mistakes repeatedly show up when developers work through How to Pass Google Play Closed Testing on the First Try:
- Confusing invited vs opted-in testers — Only testers who open the opt-in link and install from Play count toward 12. Check the opted-in number in Play Console, not your email list.
- Recruiting exactly 12 with no buffer — One uninstall can break continuity. Aim for ~15 active opted-in testers.
- Starting the counted clock late — Listing assets, Data safety, and privacy work should run during the 14 days, not after.
- Using sideloaded APKs or fake installs — They do not satisfy Play’s closed testing expectations and can create account risk.
- Ignoring tester feedback until day 14 — Crashes that drive uninstalls threaten your streak and your review outcome.
- Requesting production access before the continuous streak completes — Eligibility checks fail even if calendar time has passed.
Troubleshooting checklist
If something feels “stuck” while applying How to Pass Google Play Closed Testing on the First Try, walk this list before changing strategy:
| Symptom | Likely cause | Fix |
|---|---|---|
| Console shows < 12 testers | Invites sent but not opted in | Resend opt-in link; confirm install from Play |
| “Not eligible” after 14 calendar days | Count dipped below 12 mid-window | Restore 12+ and complete a full continuous streak |
| Tester cannot join | Wrong account, Group lag, or track not published | Verify Google account, Group membership, track release |
| App fails to install | Device/API mismatch or signing issue | Check AAB, minSDK, Play App Signing |
| Production still rejected after testing | Policy, declarations, or stability — not the clock | Read the exact reason; fix that category completely |
Visual placeholder: Troubleshooting flowchart for How to Pass Google Play Closed Testing on the First Try.
Action checklist
Use this checklist alongside the rest of this guide on How to Pass Google Play Closed Testing on the First Try:
- ☐ Closed testing track created with a signed release (AAB)
- ☐ Opt-in link tested on a fresh Google account
- ☐ At least 12 testers opted in (prefer ~15)
- ☐ Daily check that opted-in count stays ≥ 12 for 14 continuous days
- ☐ Core flows exercised (login, main feature, permissions, offline/online)
- ☐ Crashes / ANRs triaged from tester reports and vitals
- ☐ Store listing, screenshots, and feature graphic drafted
- ☐ Privacy policy + Data safety + content rating aligned with real behavior
- ☐ Production access requested only after eligibility is green
- ☐ Staged rollout plan ready for first public release
Additional FAQs developers ask about How to Pass Google Play Closed Testing on the First Try
Quick answer: what should I do first?
Confirm you are on a closed testing track with real opted-in installs, keep 12+ testers for 14 continuous days, and fix policy/stability issues in parallel. Then use the detailed sections above for How to Pass Google Play Closed Testing on the First Try.
Does this apply to organization (company) accounts?
The classic 12×14 closed testing gate is primarily associated with new personal developer accounts. Always verify your account type and current Play Console eligibility messaging for your app.
Do friends and family count as testers?
Yes — if they opt in via your closed testing link and install from Google Play. They only help if they stay opted in for the continuous period.
Can I update the app during the 14 days?
You can usually push updates on the closed track, but unstable releases that cause uninstalls can threaten your tester count. Prefer polishing via internal testing first when possible.
What if production access is still rejected?
Read the exact reason. Incomplete testing is only one category — policy, Data safety mismatches, and crashes are common. Fix the cited issue fully before reapplying.
Is paying for testers allowed?
Using real people who install from Play is what matters. Avoid fake install farms. A one-time managed service that supplies real closed testers is a practical option when DIY recruitment is too slow.
How is Fast Testers different from free communities?
Free communities trade time and mutual availability. Fast Testers assigns about 15 real testers after you submit a valid closed testing link (one-time $15 per app) and includes a production access guarantee under its refund terms.
Where should I go next?
Review the related guides below, then either finish DIY recruitment or start closed testing if you need speed and continuity.
Sources, updates, and how to use this guide
This article on How to Pass Google Play Closed Testing on the First Try is maintained for Android developers preparing Google Play closed testing and production access. Always cross-check eligibility text inside your own Play Console, because Google’s UI labels and account rules can vary by account type and date.
- Primary official references: Google Play closed testing help, Developer Program Policies, and Play Console eligibility messaging for your app.
- Practical experience lens: guidance here reflects common failure modes indie developers and agencies hit when recruiting testers, maintaining the 14-day streak, and recovering from production-access rejections.
- Last reviewed focus: 12×14 closed testing continuity, real vs fake testers, and parallel listing/compliance work during the window.
Related guides and next steps
Continue building topical depth around How to Pass Google Play Closed Testing on the First Try with these Fast Testers resources:
- Closed Testing Vs Open Testing On Google Play
- Google Play Internal Testing Vs Closed Testing
- Common Google Play Closed Testing Mistakes
- Google Play Android Vitals During Closed Testing
- Google Play Closed Testing
- Google Play Closed Testing Dashboard Metrics Explained
- Google Play Closed Testing Email Templates For Testers
- Google Play Closed Testing Faq 50 Answers
- Pricing — $15 closed testing
- How Fast Testers works
- FAQ
- Developer reviews
- Case studies
- Submit your app / start closed testing
Need reliable testers so your 14-day streak does not stall? Educate first with the guides above, then start when you are ready — one-time pricing, real Play installs, dashboard tracking.
Further expansion — case study, decisions, and expert recommendations. Prior sections remain unchanged.
Case study: first Play launch planned around the closed testing window
Problem: A small SaaS team treated Google Play publishing like iOS TestFlight — they expected to upload and go public the same week. They discovered the personal-account closed testing gate mid-sprint.
Solution: They reframed the sprint around How To Pass Google Play Closed Testing On The First Try: internal testing for crash triage first, then closed testing with a buffer of testers, while design finished screenshots and legal finished privacy/Data safety in parallel.
Result: The 14-day requirement stopped feeling like “dead time.” When eligibility flipped green, listing and declarations were already ready, so production review was the only remaining gate.
Lessons learned:
- Start the closed track as soon as the build is stable enough to keep installed.
- Parallelize compliance work inside the window.
- Protect the streak like a production SLA.
Decision guide: what should you do next?
Use this decision path when applying How To Pass Google Play Closed Testing On The First Try:
- Is your account a new personal developer account that still needs production access?
If yes, plan for closed testing with 12+ opted-in testers for 14 continuous days. If no, still test — but confirm the exact eligibility text in Play Console. - Do you already have 12+ reliable people who will install from Play and stay for two weeks?
If yes, DIY can work — add a buffer and monitor daily. If no, use community exchange or a managed closed testing service. - Is your build stable enough that testers will not churn?
If no, run internal testing first. Entering the counted window with crash loops is how streaks die. - Are Data safety, privacy policy, permissions, and listing aligned with real behavior?
If no, fix during the window so production review does not bounce you after the clock. - Has production access been rejected?
Classify: eligibility vs policy vs declarations vs stability. Fix that category completely, then re-test / re-request.
Visual placeholder: Decision tree diagram for How To Pass Google Play Closed Testing On The First Try (DIY vs managed vs fix-and-retry).
Expert recommendations
- Instrument the streak: Check opted-in count daily for the first week; replace dropouts same day.
- Brief testers once: Send a short checklist (install from Play, open app daily, try core flow, report crashes). Silent testers still count if opted in — engaged testers protect quality.
- Never “solve” recruitment with fake installs: It fails the intent of closed testing and can create account risk.
- Ship a boring-stable build to closed testing: Save experimental features for internal tracks.
- Educate first, then accelerate: If your blocker is simply finding real testers fast, a one-time managed option (Fast Testers: 15 testers, $15/app) is often cheaper than slipping a launch.
For hands-on setup after reading about How To Pass Google Play Closed Testing On The First Try, see how it works and pricing, or submit your closed testing link when you are ready.
Internal navigation hub — added to strengthen topical connections. Original article content above is unchanged.
Topic cluster: Google Play Closed Testing
Pillar guide: Start with Google Play Closed Testing Complete Guide for the full overview, then use the supporting guides below.
- Google Play Closed Testing Complete Guide (pillar)
- Google Play Closed Testing Guide: How to Get 12 Testers for 14 Days
- Google Play Closed Testing Requirements in 2026
- How to Create a Closed Testing Track in Play Console
- Google Play Closed Testing Opt-In Link Setup
- How Long Does Google Play Closed Testing Take?
- Common Google Play Closed Testing Mistakes to Avoid
- Updating Your App Mid Closed Testing Period
- Google Play Closed Testing FAQ: 50 Answers
- Avoiding Tester Dropout During 14-Day Testing
Continue learning
- Common Google Play Closed Testing Mistakes to Avoid — The most common Google Play closed testing mistakes — wrong track, too few testers, dropouts, sideloading — an.
- Google Play Closed Testing Requirements in 2026 — A complete, up-to-date breakdown of Google Play closed testing requirements in 2026: the 12-tester rule, 14-da.
- How Long Does Google Play Closed Testing Take? — Learn about testing timelines for Google Play closed testing. Complete guide for Android developers publishing.
- Google Play Android Vitals During Closed Testing — Learn about vitals monitoring for Google Play closed testing. Complete guide for Android developers publishing.
- Google Play Closed Testing Complete Guide — A comprehensive walkthrough of the entire closed testing process..
- Google Play Closed Testing Dashboard Metrics Explained — Learn about dashboard analytics for Google Play closed testing. Complete guide for Android developers publishi.
Next steps
- Ready to run closed testing with real Android testers? Submit your app or see pricing ($15 one-time).
- Compare options on our testing service comparison page, or read developer reviews and case studies.
- Still deciding? Review how Fast Testers works and the FAQ.