
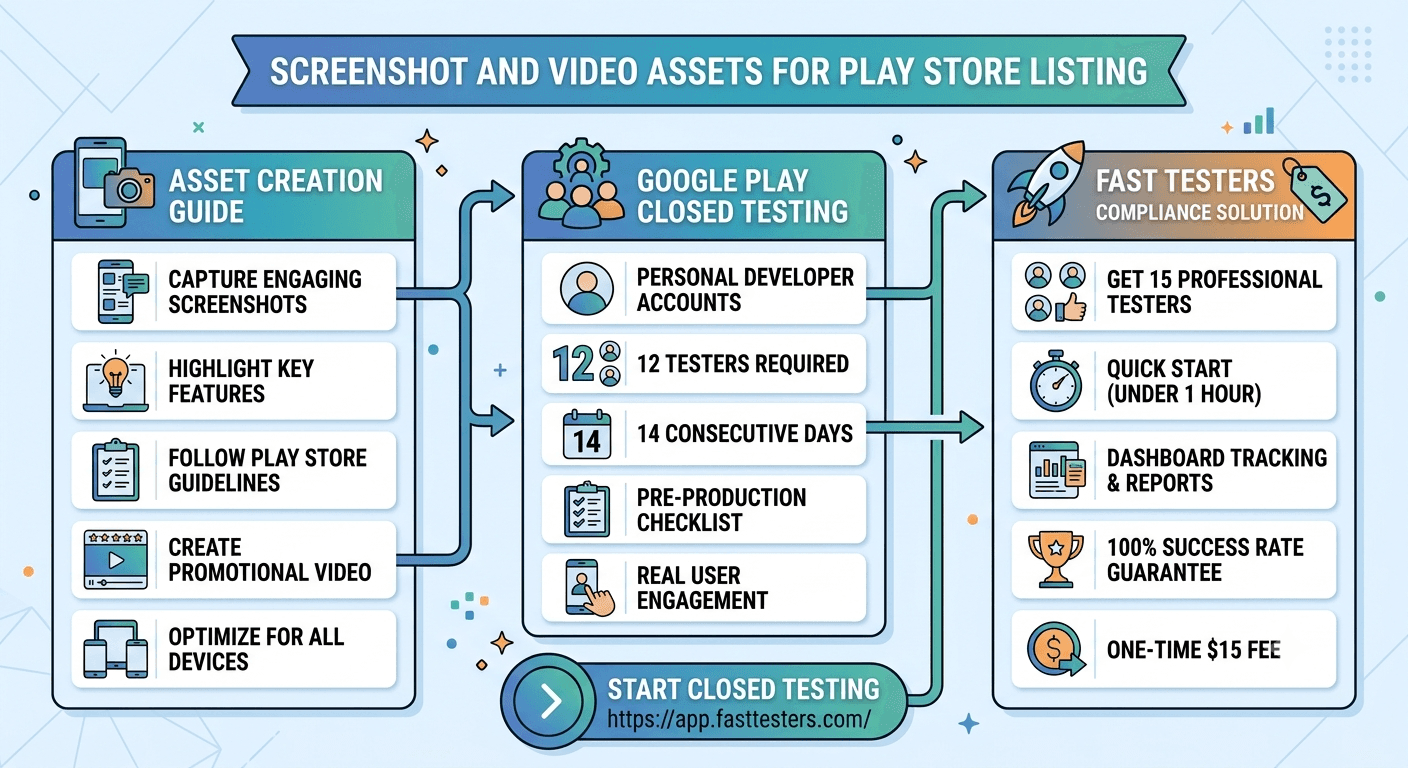
Preparing your app for launch requires more than clean code. To distribute your application via the Google Play Console, you must create a compelling Play Store listing. This guide breaks down the core store asset creation rules, specifically focusing on satisfying Google's mandatory Google Play closed testing phases for new personal developer accounts.
Why Google Play Closed Testing Requires Complete Assets
Personal developer accounts created after November 2023 must run a rigorous closed testing track before requesting production access. Google mandates that you recruit at least 12 testers for 14 consecutive days.
Because your chosen testers must download your app directly through the official Play Store interface, your application listing must feature complete, policy-compliant graphic assets before you can successfully invite external participants. Skipping, rushing, or faking this setup leads directly to rejected production applications and extended launch delays.

Required Play Store Listing Assets & Dimensions
Google enforces strict technical limits for every image uploaded to the Play Console. Use this core specifications table to prepare your export files:
| Asset Type | Required Dimensions | Format & Max Size | Key Rule |
|---|---|---|---|
| App Icon | 512 x 512 px | 32-bit PNG (Up to 1 MB) | Must use transparent or solid background shapes. No badges. |
| Feature Graphic | 1024 x 500 px | JPEG or 24-bit PNG (Up to 15 MB) | Place prominent branding center-stage. Avoid text near edges. |
| Phone Screenshots | Min: 320 px / Max: 3840 px | 16:9 or 9:16 aspect ratio | Upload between 2 to 8 unique device screenshots. |
| App Preview Video | YouTube URL link | Landscape preferred | Turn off monetization. Keep it under 30 seconds. |
What Google Checks During Closed Testing Reviews
During the 14-day evaluation window, Google automated guardrails and manual reviewers verify explicit performance metrics. They check that authentic users deliberately opt into your track, install the package from the Play Store ecosystem, and actively keep the software on their physical device. Emulator installations, unverified sideloaded APKs, and bulk install farms are flagrantly ignored and can penalize your developer profile.
Step-by-Step Compliance Framework
- Upload the App Package: Build your signed release bundle (.aab) and upload it directly into the Closed testing track in your Google Play Console.
- Complete the Store Presence: Populate all text fields and upload the mandatory dimensions outlined in the asset table above.
- Retrieve the Opt-In Link: Generate your unique web or Android opt-in URL directly from your track's "Testers" tab.
- Recruit Verified Testers: Engage 12 to 15 reliable, real-world Android users. (Alternatively, Fast Testers assigns 15 verified, active testers to your build in roughly 1 hour for a one-time fee of $15).
- Track Activity Metrics: Keep close watch over daily retention analytics inside the console dashboard for 14 continuous days.
- Apply For Production: Compile your testing feedback summary data and apply for full production launch access.
- Confusing Internal Testing tracks with the mandatory Closed Testing ecosystem.
- Letting your active daily count dip below 12 testers midway through your window.
- Submitting the production request on day 13 or earlier.
- Manually emailing raw APK files rather than routing traffic via the official Play Store link.
How Fast Testers Streamlines Your Compliance
Fast Testers removes the logistical stress out of launching independent Android applications. For a simple, flat $15 per app fee (no recurring subscriptions), you get an active team of 15 professional Android developers and testers added to your console. You receive deep dashboard metrics tracking, comprehensive diagnostic testing reports, and a solid production access approval guarantee. With a historical 99.9% success rate across more than 1,500 apps, we pave your fastest path to the public marketplace.
Ready to Clear Google's 14-Day Testing Hurdle?
Get 15 real, high-quality Android testers enrolled in your closed testing track within one hour.
Start Closed Testing Now →Frequently Asked Questions
Perfect your assets during the testing window
Since a new personal account must complete a closed test with 12 testers opted in for 14 continuous days before production, you have a natural window to capture and refine your screenshots and preview video before launch. Listing assets are among the tasks to complete in parallel with the mandatory period, so use the 14 days to produce polished visuals and test them on your testers. See our closed testing guide and store listing optimization.
Your testers can tell you whether your screenshots actually convey the app's value or just show screens. Ask which images made them understand the app fastest. If you need real testers to react to your visuals, you can submit your app. See feature graphic tips.
Crafting screenshots that convert
Effective screenshots do not merely depict the UI — they sell benefits. Lead with your strongest feature, add short captions that state the value, and order them as a narrative that walks a browser through why to install. Use device frames and consistent styling, and ensure text is legible at thumbnail size. Provide screenshots for the form factors you support (phone, and tablet if applicable) so your listing looks complete everywhere. Follow Google's asset specs precisely. See Google's graphic asset requirements and tablet and foldable testing.
A preview video, when done well, raises conversion further by showing the app in motion. Keep it short, front-load the core value in the first seconds, and make sure it stands alone without sound. Localize captions and video text for key markets if you serve multiple languages. See multi-language app testing.
Test, launch, and iterate
Treat your visual assets as conversion tools you can improve. If two screenshot sets both test well with testers, choose the one that most clearly communicates value, then after launch watch your listing conversion in the Play Console and iterate if it underperforms. Small changes to the first two screenshots often move conversion the most, since many users decide there. See post-launch monitoring and competitor analysis.
Keep every listing element consistent — icon, feature graphic, screenshots, video, and copy telling one story. Assembled and tested during your window, a coherent set of assets turns store traffic into installs from day one. See title and description SEO.
Related guides and resources
- Feature graphic design tips
- App title and description SEO
- Store listing optimization before launch
- Google Play graphic asset specs
Capturing clean, high-quality screenshots
Quality screenshots start with clean captures: use realistic but tidy data (no placeholder "asdf" text), a consistent theme, and the highest resolution your target devices support. Capture during your window on real devices so the screenshots reflect the actual experience, and retake them whenever your UI changes so the listing never shows a stale design. Consider whether to show pure UI or add light framing and captions — captioned, benefit-led images generally convert better than bare screenshots. See dark mode and theme testing and Google's asset specifications.
If you support multiple form factors or languages, produce the matching sets — tablet screenshots and localized captions — so every audience sees a complete, native-feeling listing. The window gives you time to generate these variants and check them with representative testers. See tablet and foldable testing and multi-language app testing.
Ordering and storytelling
The sequence of your screenshots is a narrative, so order them to build a case: open with your single strongest value, follow with the features that support it, and end with social proof or a call to action if relevant. Because many users only glance at the first two images, front-load your most persuasive content there. A deliberate order converts better than a random screenshot dump, and testing the sequence with real users during your window reveals which opening resonates. See feature graphic tips and handling user reviews.
After launch, treat the set as iterable: if conversion lags, reorder or replace the leading images and watch the effect in the Play Console. Screenshots are among the highest-leverage listing elements, so ongoing refinement pays off. See post-launch monitoring.
Screenshot and video FAQ
How many screenshots should I provide?
Provide enough to tell your value story — typically several phone screenshots, plus tablet ones if you support tablets — following Google's specs.
Do I need a preview video?
Not required, but a short, well-made video that front-loads value can raise conversion. Ensure it works without sound.
Which screenshots matter most?
The first two, since many users decide there. Lead with your strongest feature and a clear benefit caption.
How do I capture clean screenshots?
Use realistic tidy data, a consistent theme, and high resolution, captured on real devices during your window, and retake them when the UI changes.
Do I need localized or tablet screenshots?
If you support those languages or form factors, yes. Provide matching sets so every audience sees a complete, native-feeling listing.
Can I improve screenshots after launch?
Yes. If conversion lags, reorder or replace the leading images and watch the effect in the Play Console — they are high-leverage elements.
Bottom line
Screenshots and a preview video are among the strongest conversion levers on your listing, so capture them cleanly, caption them for benefits, order them as a story, and provide the localized and form-factor variants your audience needs. The closed-testing window gives you time to produce and test these assets on real users before launch, then refine them with conversion data afterward. If you need real testers to react to your visuals, you can submit your app. See feature graphic tips to complete the set.
Expanded for topical authority — additional practical sections below. Original guide content above is unchanged.
Quick answer
Screenshot and Video Assets for Play Store Listing matters because Google Play production access for many new personal developer accounts depends on a successful closed test: at least 12 real testers opted in for 14 continuous days, plus a policy-compliant, stable app. Use this guide to execute the steps correctly, avoid streak-breaking mistakes, and decide whether DIY recruitment or a managed closed testing service is the better path for your deadline.
Key takeaways
- Screenshot and Video Assets for Play Store Listing should be treated as a practical Play Console workflow, not just theory.
- For many new personal accounts, 12 opted-in testers × 14 continuous days on closed testing gates production access.
- Opt-in + install from Play beats “emails invited” every time — verify counts in Console.
- Use the window for QA, listing, and compliance work so review is the only remaining gate.
- Prefer real testers and a buffer above 12; avoid anything that looks like fake engagement.
Real-world scenarios: who this matters for
The guidance in this article on Screenshot and Video Assets for Play Store Listing applies across many Android product types. Use these scenarios to map the advice to your situation.
| Developer type | Typical challenge | Practical focus |
|---|---|---|
| Indie / solo | Limited tester network and time | Start closed testing early; keep a buffer above 12 opted-in testers; parallelize listing + Data safety work |
| Startup | Launch deadline vs 14-day rule | Treat the window as fixed; recruit in parallel with QA; avoid last-minute track setup |
| Agency / white-label | Multiple client apps, each needing its own test | One closed test per app; standardize opt-in onboarding; track eligibility dates per client |
| Flutter / React Native | Cross-platform build + Play Console quirks | Ship a signed AAB to closed testing; verify installs from Play, not sideload; watch vitals on mid-range devices |
| Native Kotlin | Device/API fragmentation | Cover API levels and OEMs in your tester mix; fix crashes before requesting production |
| Game / Unity | Performance + retention during 14 days | Keep testers engaged so count never dips below 12; monitor ANRs and battery |
| E-commerce / fintech | Policy + payment flows | Test checkout, permissions, and declarations carefully before production access |
| Healthcare / kids / education | Sensitive policies (Families, data) | Align listing, privacy, and content rating with real app behavior during the test window |
Visual placeholder: Scenario matrix infographic — Indie / Startup / Agency / Cross-platform paths for Screenshot and Video Assets for Play Store Listing.
Closed testing vs other Play tracks (quick reference)
Context for Screenshot and Video Assets for Play Store Listing: choose the right track so you do not waste the 14-day window on the wrong workflow.
| Track | Purpose | Counts toward 12×14? | Typical use |
|---|---|---|---|
| Internal testing | Fast private builds | No | Shake out bugs before the counted window |
| Closed testing | Private / invite testers | Yes (for new personal accounts) | Meet production-access requirement + QA |
| Open testing | Public beta | Not a substitute for the closed requirement | Broader feedback after closed eligibility |
| Production | Public release | N/A | After access approved + review |
Visual placeholder: Timeline — Internal → Closed (14 days) → Production request → Staged rollout.
Common mistakes (and how to avoid them)
These mistakes repeatedly show up when developers work through Screenshot and Video Assets for Play Store Listing:
- Confusing invited vs opted-in testers — Only testers who open the opt-in link and install from Play count toward 12. Check the opted-in number in Play Console, not your email list.
- Recruiting exactly 12 with no buffer — One uninstall can break continuity. Aim for ~15 active opted-in testers.
- Starting the counted clock late — Listing assets, Data safety, and privacy work should run during the 14 days, not after.
- Using sideloaded APKs or fake installs — They do not satisfy Play’s closed testing expectations and can create account risk.
- Ignoring tester feedback until day 14 — Crashes that drive uninstalls threaten your streak and your review outcome.
- Requesting production access before the continuous streak completes — Eligibility checks fail even if calendar time has passed.
Troubleshooting checklist
If something feels “stuck” while applying Screenshot and Video Assets for Play Store Listing, walk this list before changing strategy:
| Symptom | Likely cause | Fix |
|---|---|---|
| Console shows < 12 testers | Invites sent but not opted in | Resend opt-in link; confirm install from Play |
| “Not eligible” after 14 calendar days | Count dipped below 12 mid-window | Restore 12+ and complete a full continuous streak |
| Tester cannot join | Wrong account, Group lag, or track not published | Verify Google account, Group membership, track release |
| App fails to install | Device/API mismatch or signing issue | Check AAB, minSDK, Play App Signing |
| Production still rejected after testing | Policy, declarations, or stability — not the clock | Read the exact reason; fix that category completely |
Visual placeholder: Troubleshooting flowchart for Screenshot and Video Assets for Play Store Listing.
Action checklist
Use this checklist alongside the rest of this guide on Screenshot and Video Assets for Play Store Listing:
- ☐ Closed testing track created with a signed release (AAB)
- ☐ Opt-in link tested on a fresh Google account
- ☐ At least 12 testers opted in (prefer ~15)
- ☐ Daily check that opted-in count stays ≥ 12 for 14 continuous days
- ☐ Core flows exercised (login, main feature, permissions, offline/online)
- ☐ Crashes / ANRs triaged from tester reports and vitals
- ☐ Store listing, screenshots, and feature graphic drafted
- ☐ Privacy policy + Data safety + content rating aligned with real behavior
- ☐ Production access requested only after eligibility is green
- ☐ Staged rollout plan ready for first public release
Additional FAQs developers ask about Screenshot and Video Assets for Play Store Listing
Quick answer: what should I do first?
Confirm you are on a closed testing track with real opted-in installs, keep 12+ testers for 14 continuous days, and fix policy/stability issues in parallel. Then use the detailed sections above for Screenshot and Video Assets for Play Store Listing.
Does this apply to organization (company) accounts?
The classic 12×14 closed testing gate is primarily associated with new personal developer accounts. Always verify your account type and current Play Console eligibility messaging for your app.
Do friends and family count as testers?
Yes — if they opt in via your closed testing link and install from Google Play. They only help if they stay opted in for the continuous period.
Can I update the app during the 14 days?
You can usually push updates on the closed track, but unstable releases that cause uninstalls can threaten your tester count. Prefer polishing via internal testing first when possible.
What if production access is still rejected?
Read the exact reason. Incomplete testing is only one category — policy, Data safety mismatches, and crashes are common. Fix the cited issue fully before reapplying.
Is paying for testers allowed?
Using real people who install from Play is what matters. Avoid fake install farms. A one-time managed service that supplies real closed testers is a practical option when DIY recruitment is too slow.
How is Fast Testers different from free communities?
Free communities trade time and mutual availability. Fast Testers assigns about 15 real testers after you submit a valid closed testing link (one-time $15 per app) and includes a production access guarantee under its refund terms.
Where should I go next?
Review the related guides below, then either finish DIY recruitment or start closed testing if you need speed and continuity.
Sources, updates, and how to use this guide
This article on Screenshot and Video Assets for Play Store Listing is maintained for Android developers preparing Google Play closed testing and production access. Always cross-check eligibility text inside your own Play Console, because Google’s UI labels and account rules can vary by account type and date.
- Primary official references: Google Play closed testing help, Developer Program Policies, and Play Console eligibility messaging for your app.
- Practical experience lens: guidance here reflects common failure modes indie developers and agencies hit when recruiting testers, maintaining the 14-day streak, and recovering from production-access rejections.
- Last reviewed focus: 12×14 closed testing continuity, real vs fake testers, and parallel listing/compliance work during the window.
Related guides and next steps
Continue building topical depth around Screenshot and Video Assets for Play Store Listing with these Fast Testers resources:
- Google Play Store Listing Optimization Before Launch
- Accessibility Testing Before Play Store Launch
- Background Location Apps And Play Store Review
- Battery Usage Testing And Play Store Vitals
- Biometric Login Apps And Play Store Compliance
- Bootstrapped Developer Play Store Launch On 15
- Coppa And Kids Apps On Google Play Store
- Customer Support Setup Before Play Store Launch
- Pricing — $15 closed testing
- How Fast Testers works
- FAQ
- Developer reviews
- Case studies
- Submit your app / start closed testing
Need reliable testers so your 14-day streak does not stall? Educate first with the guides above, then start when you are ready — one-time pricing, real Play installs, dashboard tracking.
Internal navigation hub — added to strengthen topical connections. Original article content above is unchanged.
Continue learning
- COPPA and Kids Apps on Google Play Store — Learn about COPPA compliance for Google Play closed testing. Complete guide for Android developers publishing .
- Enterprise Internal Apps vs Public Play Store Apps — Learn about enterprise distribution for Google Play closed testing. Complete guide for Android developers publ.
- Handling User Reviews After Play Store Launch — Learn about review management for Google Play closed testing. Complete guide for Android developers publishing.
- Refund Policy Page Requirements for Play Store — Learn about refund policy setup for Google Play closed testing. Complete guide for Android developers publishi.
- Startup Guide: Launch Android App on Play Store Fast — Learn about startup launch strategy for Google Play closed testing. Complete guide for Android developers publ.
- Testing Utility Apps: Play Store Compliance Tips — Learn about utility app testing for Google Play closed testing. Complete guide for Android developers publishi.
Next steps
- Ready to run closed testing with real Android testers? Submit your app or see pricing ($15 one-time).
- Compare options on our testing service comparison page, or read developer reviews and case studies.
- Still deciding? Review how Fast Testers works and the FAQ.